Modeling the Shell Suggest edits
By defining how a Shell is modeled in CloudShell we can control how its represented in CloudShell. If you’ve gone through the steps of the Getting Started tutorial you may have noticed that with little effort we’ve already managed to model a new type of entity. In this section we’ll take a more in depth look at how we can customize how the Shell resources or deployed apps are viewed and behave in CloudShell. In the following sections we’ll also look into how to add commands by writing a driver, but its important to note that even this initial step is enough in order to install and use a new Shell in CloudShell.
Setting the Standard
The first thing to do is to classify the Shell according to one of the CloudShell standards. CloudShell has a growing number of standards defined which make it easier to create a new Shell without having to re-invent its structure and properties. To give a few examples:
Each standard has one or more ShellFoundry templates associated with it, so the best way to create a compliant Shell is to use the ShellFoundry template parameter.
To get a list of the possible templates, run the following from Command Line:
shellfoundry listFor this example, we’ll use the resource-clean template, which is a clean implementation of the Shell’s basic standard, a generic standard for any standalone Shell. We’ll look into some of the standards in greater depth in future sections of this guide.
Run the following from Command Line:
shellfoundry new model_example --template=resource-clean
cd model_example
To complete the basic setup, create a resource for that Shell in the Inventory page of the CloudShell and reserve it. If you’d like to review again the steps of how to do that, please refer to the Getting Started guide.
The Shell Datamodel
As you may have seen in previous examples, by using ShellFoundry we’ve generated a Shell project which can be deployed to CloudShell. This time, however, we’ll take a look at some of the important settings of the Shell model and demonstrate how it can be customized.
There are two important files located in the datamodel directory which are relevant to how the Shell is modeled.
-
The datamodel.xml represents the CloudShell Standard. You should avoid modifying the datamodel.xml file as it represents definitions that are a part of the CloudShell standard relevant to the Shell type. It is helpful, however, to review this file in order to understand how it is structured and the type of data it presents.
-
The shell_model.xml file represents the modeling definitions of your specific Shell and is where we’ll make most of the changes.
Resource Families
Resource families represent broad categories or abstract types or roles of resources. Examples of families are: Switch, Router, Firewall or Generic App. The families in the datamodel.xml file are listed under the <ResourceFamilies> element. Each of the families can come predefined with its own attributes and additional metadata. Using the resource-shell standard, we get the generic_resource, port, and power_port families.
Resource models
Models are more specific types of resources and apps in CloudShell. For physical resource Shells the model corresponds to the specific vendor/OS combination the Shell covers. For deployed apps, the model is usually one to one with the app itself. There are also more generic models which represent basic components like ports or connectors which don’t always need a high level of detailed modeling. In terms of hierarchy, every resource in CloudShell has a model and each model belongs to a family
- Examples of resource shell models: Cisco NXOS Switch, Raritan PDU
- Examples of deployed app shell models: Windows OS, MySQL, TeraVM TG Controller, JMeter
- Examples of generic component models: Resource Port, Generic Power Port
In the Shell project structure, the datamodel.xml contains the models which are a part of the Standard our Shell implements. These are by definition not vendor, device or app specific but more general components. Looking at the models defined in the datamodel.xml file of our Shell we can similarly see it contains some very basic building blocks like Resource Port and Power Port. Again, each of them has their attribute The model for the Shell we’re developing, is actually not a part of the datamodel.xml file. Our Shell just points to and extends the standard.
Our Shell is actually defined in the shell_model.xml file. The reason for the separation is that the shell_model.xml file is actually the one we’ll mostly want to extend or customize. By default, when we generated the Shell via ShellFoundry, a ResourceModel was automatically created as the Shell model with the same name of the Shell, which is the convention. The shell_model.xml file which was automatically generated for our basic resource shell contains the following content:
<Shell>
    <ShellAttributes>
    </ShellAttributes>

    <ShellModel Family="Generic Resource">
        <ResourceModel Name="ModelExample" Description="" SupportsConcurrentCommands="false">
            <AttachedAttributes>
                <AttachedAttribute Name="User" IsOverridable="true" IsLocal="true">
                  <AllowedValues />
                </AttachedAttribute>
                <AttachedAttribute Name="Password" IsOverridable="true" IsLocal="true">
                  <AllowedValues />
                </AttachedAttribute>
                <AttachedAttribute Name="Power Management" IsOverridable="true" IsLocal="true">
                  <AllowedValues />
                </AttachedAttribute>
                <AttachedAttribute Name="Enable Password" IsOverridable="true" IsLocal="true">
                  <AllowedValues />
                </AttachedAttribute>
                <AttachedAttribute Name="System Name" IsOverridable="true" IsLocal="true">
                  <AllowedValues />
                </AttachedAttribute>
                .... (more content here) ...
                <AttachedAttribute Name="CLI Connection Type" IsOverridable="true" IsLocal="true">
                  <AllowedValues />
                </AttachedAttribute>
            </AttachedAttributes>
            <AttributeValues>
                <AttributeValue Name="User" Value="" />
                <AttributeValue Name="Password" Value="3M3u7nkDzxWb0aJ/IZYeWw==" />
                <AttributeValue Name="Enable Password" Value="3M3u7nkDzxWb0aJ/IZYeWw==" />
                <AttributeValue Name="System Name" Value="" />
                <AttributeValue Name="Contact Name" Value="" />
                <AttributeValue Name="OS Version" Value="" />
                <AttributeValue Name="Vendor" Value="" />
                <AttributeValue Name="Location" Value="" />
                <AttributeValue Name="Model" Value="" />
                <AttributeValue Name="Backup Location" Value="" />
                .... (more content here) ...
                <AttributeValue Name="CLI Connection Type" Value="Auto" />
                <AttributeValue Name="Power Management" Value="False" />
              </AttributeValues>
            <ParentModels />
            <Drivers>
                <DriverName>ModelExampleDriver</DriverName>
            </Drivers>
            <Scripts />
        </ResourceModel>
    </ShellModel>
</Shell>
As you can see in the XML code above, our new Shell defines a unique model (“ModelExample”). The model already has some attributes associated with it which are defined in the Standard. We can customize the Shell datamodel in several ways by making changes to this file.
Changing the Shell image and description
First copy the image to the datamodel folder. To set the Shell image, add the ImagePath attribute to the <ResourceModel> element:
<ResourceModel Name="ModelExample" Description="" SupportsConcurrentCommands="false" ImagePath="example_model_image.png">To update the Shell description change the value in the “Description” attribute in the above xml.
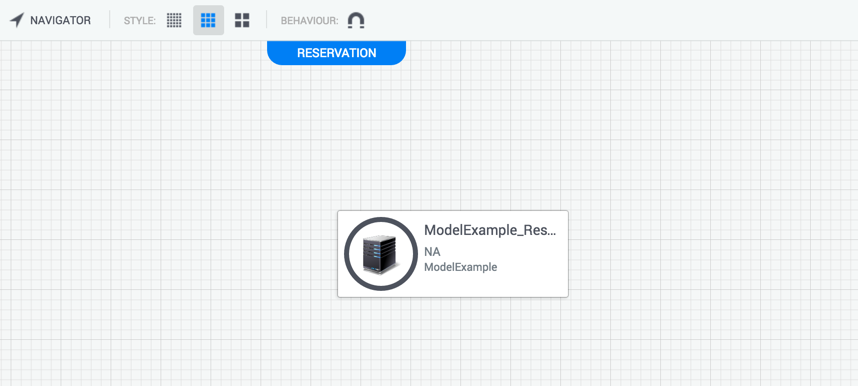
Apply changes by running:
shellfoundry installRefreshing the reservation, our shell resource will now show the updated image and description:
Adding a custom attribute to the Shell
The shell_model.xml file located in the datamodel directory contains the basic shell attributes. As you can see our new Shell model already contains a lot of attribute associations, defined in the <AttachedAttributes> and <AttributeValues> sections.
In certain situations, however, you might want to extend the Shell by adding your own custom attributes. There are several common use cases for adding an attribute:
-
Saving administrative information - from custom permission groups to categories or contact person.
-
Saving additional information about the device - This information can be loaded by the driver or used by the driver
-
Set orchestration level settings such as profile for device usage or policies
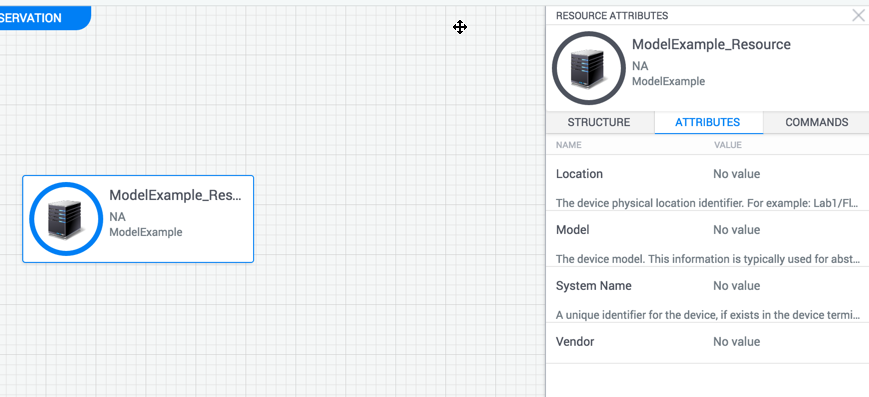
The shell_model.xml has a dedicated element just for custom attributes which you might want to add to the Shell in addition to those provided by the standard. This element is currently empty and is the <ShellAttributes> element. We can add some attribute definitions here to extend the Shell with some custom attributes.
If we open up the Attributes side pane in the sandbox page for the Shell resource we’ll see the default attributes which are as visible to end users on the web.
To add a simple attribute to the shell we first need to add an <AttributeInfo> element to this element like so:
<ShellAttributes>
    <AttributeInfo Name="ModelExample Custom Att" Type="String" DefaultValue="" IsReadOnly="false">
      <Rules>
        <Rule Name="Setting" />
      </Rules>
    </AttributeInfo>
</ShellAttributes>
By adding this element, we’ve defined a new attribute. Next, we’ll want to associated the new custom attribute to our Shell model and set the value for it. We do this by adding both an <AttachedAttribute> and a <AttributeValue> elements.
First, under the <AttachedAttributes> element, append the following xml code (before, after or between the existing AttachedAttribute elements)
<ShellModel Family="Generic Resource">
      <ResourceModel Name="ModelExample" Description="" SupportsConcurrentCommands="false">
          <AttachedAttributes>
              <AttachedAttribute Name="ModelExample Custom Att" IsOverridable="true" IsLocal="true">
                <AllowedValues />
              </AttachedAttribute>
              <AttachedAttribute Name="User" IsOverridable="true" IsLocal="true">
.... (more content here) ...
Lastly, add the following <AttributeValue> under the AttributeValues element. Please notice that even if you don’t want to specify a default value, you should still add this element with a blank value.
.... (more content here) ...
</AttachedAttribute>
</AttachedAttributes>
<AttributeValues>
<AttributeValue Name="ModelExample Custom Att" Value="Default Value" />
<AttributeValue Name="User" Value="" />
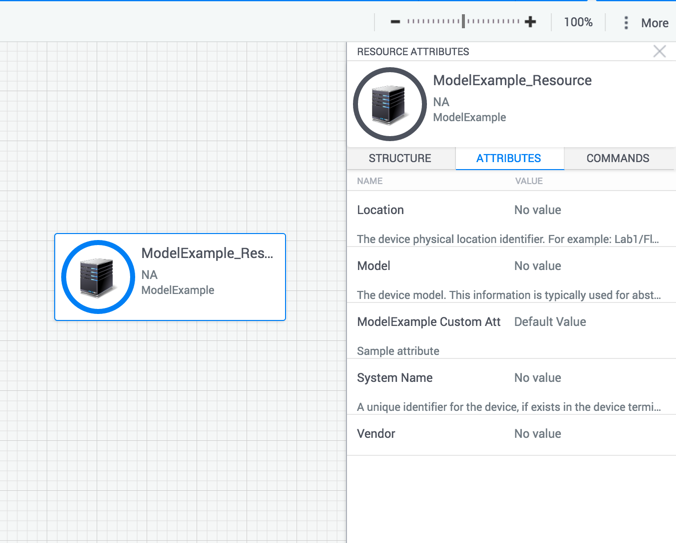
.... (more content here) ...To test whether this worked let’s re-install the Shell from Command Line:
shellfoundry installAfter refreshing the sandbox diagram and re-opening the attributes pane, you should be able to see the new attribute:
Governing the usage of custom Shell attributes
You may have noticed that when we added the attribute definition to the shell_mode.xml file, we also added the following element under it:
<Rules>
  <Rule Name="Setting" />
</Rules>
The ‘Setting’ rule which we’ve added here, indicates that this attribute is a setting that can be controlled from the sandbox or defined in the blueprint by end users. If we had not added that rule, the attribute would have been assigned to the resource but would not have appeared in the attributes pane.
There are several such Rules that can be set on attribute which can change how they behave and where they are used. We’ll cover a few here:
-
Displayed in Search Filters (Inventory Resources) - Users will be able to filter based on that attribute. It makes sense to add this rules to attributes which are constrained to a limited set of values and which are used often to filter resources. It doesn’t make sense to use this attribute for attributes with unique values such as serial number or uniqueid, since this feature enables filtering, not search.
-
Admin Only - Only administrators and domain administrators will be able to modify this attribute, users will be able to see the attribute but not modify it.
-
Available For Abstract Resources (Inventory Resources)- This attribute can be used when creating an abstract resource to specify the rules for selection.
-
Displayed In Diagram This attribute will be displayed on the diagram component itself when using the larger icon size in the diagram.
-
Displayed In Insight (CloudShell 7.1EA and above only) This attribute value will be saved in Insight and can be used to later create BI around the resources linked to it.
Restricting attributes to specific values
Its possible to improve the user experience by restricting the possible inputs for an attribute to a given set of values. To avoid unpredictable results if a user typed in OK instead of Yes, for example, or just had a typo. Any restrictions we add in this scope will be for this specific Shell only. Other Shells using the same attribute will not be affected. To add an attribute restriction, add the following to the <AttachedAttribute> element:
<AttachedAttribute Name="ModelExample Custom Att" IsOverridable="true" IsLocal="true">
  <AllowedValues>
      <AllowedValue>Protocol1</AllowedValue>
      <AllowedValue>Protocol2</AllowedValue>
      <AllowedValue>Protocol3</AllowedValue>
      <AllowedValue>Default Value</AllowedValue>

  </AllowedValues>
</AttachedAttribute>
It is important to remember to add the current value as one of the options for the possible values. Reinstall the Shell, refresh and open the attributes side pane again:
Things to watch out for when adding custom attribute
- Attribute name collisions: Avoid common general names like ‘Speed’ or ‘Connected’. Try to include the Shell name, or some other unique element to avoid name collisions.
- Only add attributes to your Shell model, avoid changing the Standard models in the datamodel.xml file.
- Only use the rules you need, adding all attributes as search filters, for example, would cause a lot of UI clutter.