Commands Visibility and Usability Suggest edits
The Shell driver commands are accessible to CloudShell users via the portal as well as to orchestration scripts running on the sandbox. In this section we’ll explore the different ways in which these commands can be customized in their appearance and behavior. The following customization options will be reviewed:
- Changing the function display name and description
- Specifying display name and descriptions for each parameter
- Optional parameters and default values
- Restricting input to a specific set of possible values
- Adding categories
- Orchestration only commands
If you haven’t done some already it is recommended to go through the Getting Started tutorial before continuing to get a better understanding of the overall process of creating and using a shell. We also assume you’ve gone through the steps described in the Setting Up the Development IDE section of this guide.
Setting up
We’ll start by creating a new shell that we’ll use in this example. In the Getting Started tutorial we used the ShellFoundry CLI tool to generate a working shell to get started quickly. In this section we’ll also be using the ShellFoundry to create an example shell, only this time we’ll use a different project template. The resource-clean template is similar to the default template we’ve used previously only it doesn’t contain any example driver functions. This will make it easier for us to really go through the experience of starting from a clean slate.
From the command line, navigate to a folder under which you’ll want the new shell to be created and type in the following:
shellfoundry new customization-example --template=resource-clean
cd customization_example
A new project with an empty driver is created.
Let’s start by creating a function we can experiment on. Open the driver file. The file is named driver.py and is located in the src folder of the shell project. Add the following function to the shell driver class and save it:
def user_facing_function(self, context, some_parameter, some_other_parameter):
    """
    :type context: cloudshell.shell.core.driver_context.ResourceCommandContext
    :type some_parameter: str
    :type some_other_parameter: str
    """
    print "Thank you for calling this function."
We’ve now created a shell with a single command. Similar to the flow covered in the Getting Started tutorial, the next steps would be to create a resource instance of this shell in CloudShell and add it to a sandbox so we can experiment with it. You should refer to the Getting Started tutorial for any question on how to accomplish the three steps below:
- Install the shell by running the following from the shell directory: shellfoundry install
- Create a resource instance from the CloudShell inventory.
- Create a new sandbox and drag the resource instance into it. Open the Commands pane.
At this point the Commands pane should look something like this:
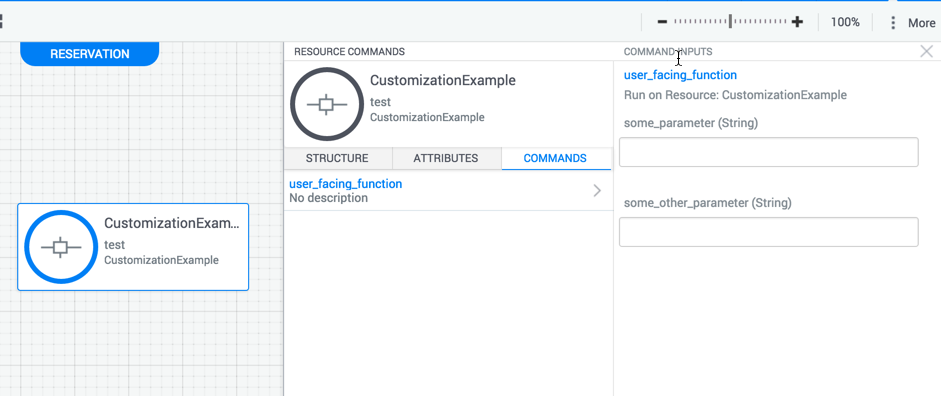
As you can see, we didn’t need to specify any additional details to get our Python functions to be visible as shell commands in the CloudShell sandbox, however the commands appear if a very ‘code’ like manner so our next step would be making them a bit more presentable.
The information on how to display the driver functions in CloudShell is stored in the drivermetadata.xml file located in the driver src directory.
Changing the function display name and description
For the first round of customizations, we’ll work on the user facing function and improve the naming of the command and its parameters as they appear to the user in CloudShell. Open the drivermetadata.xml file and add the following text to it:
<Driver Description="Describe the purpose of your CloudShell shell" MainClass="driver.CustomizationExampleDriver" Name="CustomizationExampleDriver" Version="1.0.0">
    <Layout>
        <Command Description="This command is for the user" DisplayName="User Command" Name="user_facing_function" >
        </Command>
    </Layout>
</Driver>
Each Command element in the xml above customizes a single python function specified by the Name attribute. The DisplayName and Description attributes will determine the name of the command as it appears to the user and the description appearing next to it, respectively.
Reinstall the Shell in CloudShell by running
shellfoundry installfrom command line and check the sandbox command panel again. The shell commands should now appear as follows:
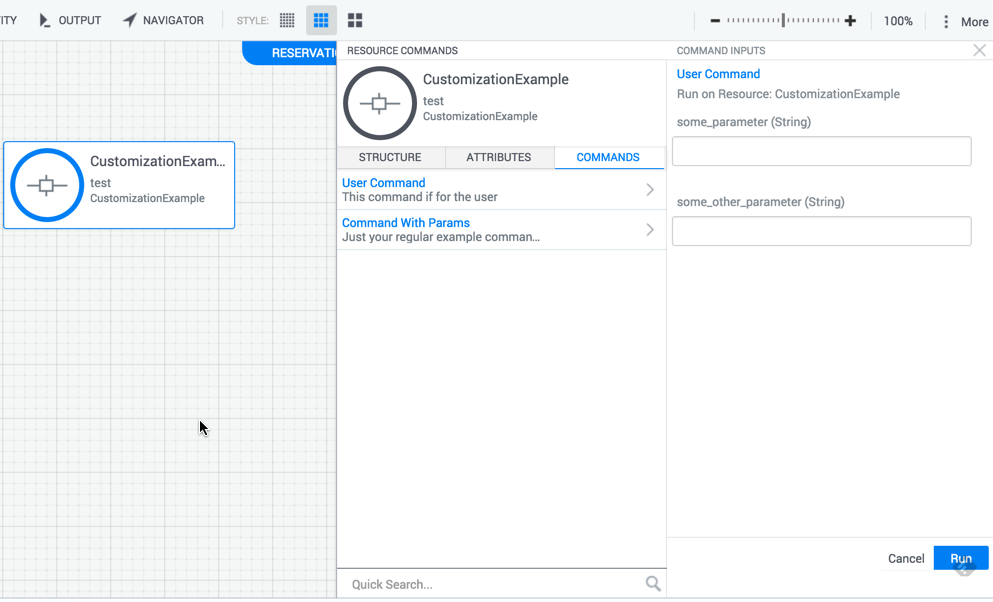
Please note that changing the display name of a function will affect only how its visually rendered in the UI. Code trying to execute this command using the CloudShell API will need to still refer to it by the command name.
Specify display name and descriptions for each parameter
You may have noticed that the parameter names still look pretty raw and code like. We might want to customize that as well. We can do that by adding additional nested elements describing the parameters under each command. Update the drivermetadata.xml file as follows:
<Driver Description="Describe the purpose of your CloudShell shell" MainClass="driver.CustomizationExampleDriver" Name="CustomizationExampleDriver" Version="1.0.0">
    <Layout>
        <Command Description="This command is for the user" DisplayName="User Command" Name="user_facing_function" >
            <Parameters>
                    <Parameter Name="some_parameter" DisplayName="Some Parameter" Description="More info here about the parameter"/>
                    <Parameter Name="some_other_parameter" DisplayName="Some Other Parameter" Description="More info here about the parameter"/>
                </Parameters>
        </Command>

    </Layout>
</Driver>
In the drivermetadata.xml XML, the Parameters element contains a list of Parameter elements, each is responsible for a specific function parameter. The DisplayName and Description attributes will determine the name of the command as it appears to the user and the description appearing next to it, respectively.
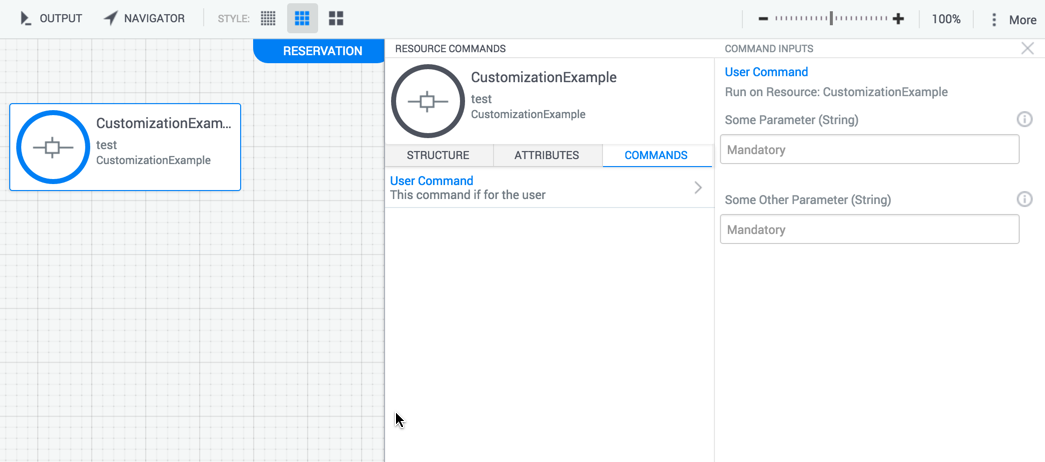
After installing the shell again, the parameters for the command will now appear in a more readable format:
Optional parameters and default values
For each of the command parameters, we may want to specify whether that parameter is mandatory for the user to supply, and whether there should be a default value in case the user didn’t enter any value.
In the following example, we will make the first parameter mandatory by setting the Mandatory attribute to True. Users will be required to enter a value for parameters before being able to run the command. The second parameter is optional but now has a default value which we will set using the DefaultValue attribute:
<Driver Description="Describe the purpose of your CloudShell shell" MainClass="driver.CustomizationExampleDriver" Name="CustomizationExampleDriver" Version="1.0.0">
<Layout>
<Command Description="This command is for the user" DisplayName="User Command" Name="user_facing_function" >
<Parameters>
<Parameter Name="some_parameter" Mandatory = "True"
DisplayName="Some Mandatory Parameter" Description="More info here about the parameter"/>
<Parameter Name="some_other_parameter" Mandatory = "False"
DisplayName="Some Optional Parameter" Description="More info here about the parameter" DefaultValue="None"/>
</Parameters>
</Command>
</Layout>
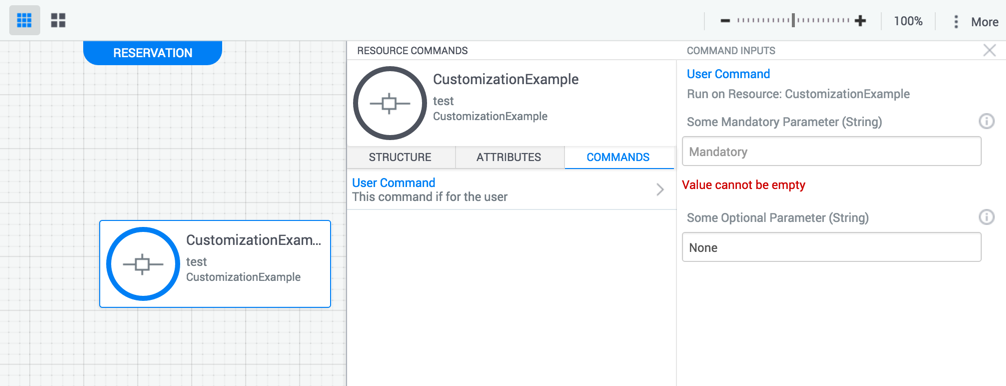
</Driver>Re-installing the shell will update the commands pane accordingly:
Restricting input to a specific set of possible values
For certain parameters, you might want the user to select between a pre-determined set of values, rather than leave the inputs as a free text entry. To set that up, you need to add that information to the parameter XML:
<Driver Description="Describe the purpose of your CloudShell shell" MainClass="driver.CustomizationExampleDriver" Name="CustomizationExampleDriver" Version="1.0.0">
<Layout>
<Command Description="This command is for the user" DisplayName="User Command" Name="user_facing_function" >
<Parameters>
<Parameter Name="some_parameter" Mandatory = "True"
DisplayName="Some Mandatory Parameter" Description="More info here about the parameter"/>
<Parameter Name="some_other_parameter" Type="Lookup" Mandatory = "False" AllowedValues="Yes,No"
DisplayName="Some Optional Parameter" Description="More info here about the parameter" DefaultValue="Yes"/>
</Parameters>
</Command>
</Layout>
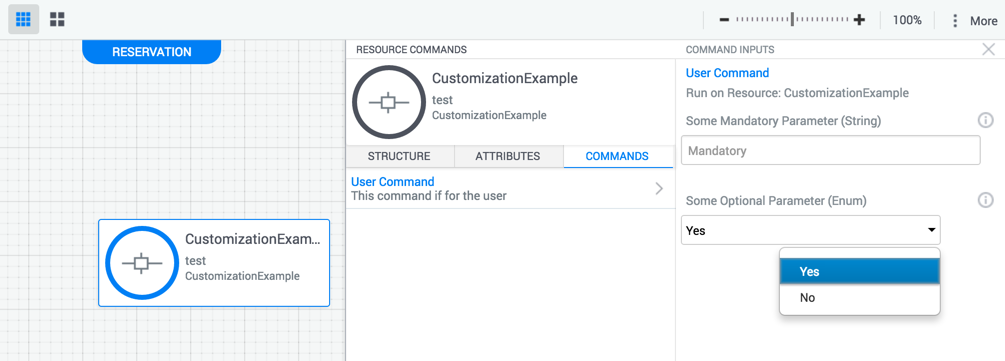
</Driver>In the xml above, we’ve specified that the second parameter must be selected out of a specific set of possible values. We did that by adding the Type attribute to the parameter element and seting it as Lookup. To define the possible values, we’ve added the AllowedValues attribute, which sets the possible values for this parameter, represented as a comma separated list. In this case, the possible values are Yes and No. We’ve also changed the default value to conform to the possible options.
After re-installing the shell, the Commands pane now reflects the parameter new value restriction:
Adding categories
As you add more commands to the resource, it can be useful to visually group them into categories and improve the usability of the commands panel. These categories will appear as folders which the user can navigate. To demonstrate this capability, let’s first add additional commands to the shell. Open the driver.py file located in the src directory and add the following two functions:
def backup(self, context):
"""
:type context: cloudshell.shell.core.driver_context.ResourceCommandContext
"""
print "Backing up..."
def restore(self, context):
"""
:type context: cloudshell.shell.core.driver_context.ResourceCommandContext
"""
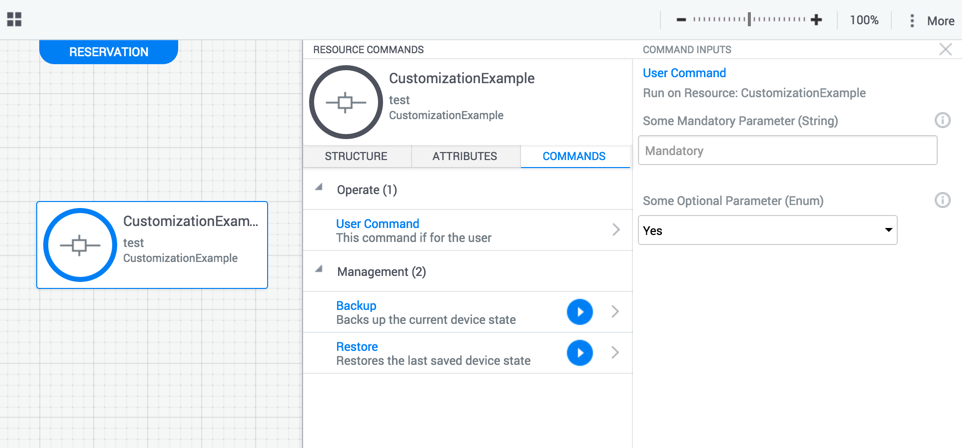
print "Restoring..."Grouping together commands under a category is pretty strait forward: Simply add a Category element and nest the relevant commands under it. In this case, we’ve added a category called Operate for the previous operation we’ve implemented and a category named Management for the new save and restore functions:
<Driver Description="Describe the purpose of your CloudShell shell" MainClass="driver.CustomizationExampleDriver" Name="CustomizationExampleDriver" Version="1.0.0">
    <Layout>
        <Category Name="Operate">
            <Command Description="This command is for the user" DisplayName="User Command" Name="user_facing_function" >
                <Parameters>
                        <Parameter Name="some_parameter" Mandatory = "True"
                                   DisplayName="Some Mandatory Parameter" Description="More info here about the parameter"/>
                        <Parameter Name="some_other_parameter" Type="Lookup" Mandatory = "False" AllowedValues="Yes,No"
                                   DisplayName="Some Optional Parameter" Description="More info here about the parameter" DefaultValue="Yes"/>
                    </Parameters>
            </Command>
        </Category>

        <Category Name="Management">
            <Command Description="Backs up the current device state" DisplayName="Backup" Name="backup" />
            <Command Description="Restores the last saved device state" DisplayName="Restore" Name="restore" />
        </Category>

    </Layout>
</Driver>
After re-installing the shell we get the following command panel layout:
Orchestration only commands
Sometimes, you may wish to create commands that are intended to be used as a part of an orchestration flow, for example to be called during setup, but that you don’t wish users to get direct access to or to be visible via the UI. For example, a command that will be called during a sandbox’s Setup process. To support this use case, CloudShell supports a special category, the Hidden Commands category which allows you to mark commands you want to be omitted from the web portal UI but that can still be invoked via the API.
To demonstrate this capability, let’s first add a new function to our driver class in the driver.py file:
def api_only_function(self, context):
    """
    :type context: cloudshell.shell.core.driver_context.ResourceCommandContext
    """
    print "You didn't see this on the web interface..."
Next, let’s add the special category to the drivermetadata.xml file and nest that command under it:
<Driver Description="Describe the purpose of your CloudShell shell" MainClass="driver.CustomizationExampleDriver" Name="CustomizationExampleDriver" Version="1.0.0">
<Layout>
<Category Name="Operate">
<Command Description="This command is for the user" DisplayName="User Command" Name="user_facing_function" >
<Parameters>
<Parameter Name="some_parameter" Mandatory = "True"
DisplayName="Some Mandatory Parameter" Description="More info here about the parameter"/>
<Parameter Name="some_other_parameter" Type="Lookup" Mandatory = "False" AllowedValues="Yes,No"
DisplayName="Some Optional Parameter" Description="More info here about the parameter" DefaultValue="Yes"/>
</Parameters>
</Command>
</Category>
<Category Name="Management">
<Command Description="Backs up the current device state" DisplayName="Backup" Name="backup" />
<Command Description="Restores the last saved device state" DisplayName="Restore" Name="restore" />
</Category>
<Category Name="Hidden Commands">
<Command Description="An API only function" DisplayName="Run me VIA API" Name="api_only_function" />
</Category>
</Layout>
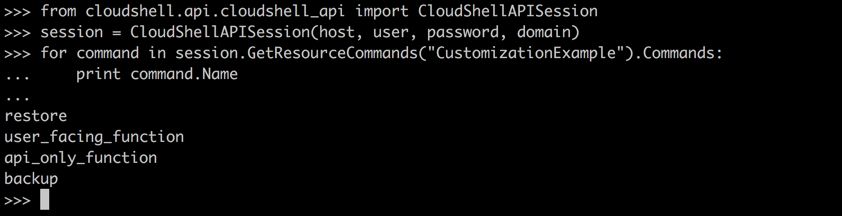
</Driver>After re-installing the shell you’ll see the new function doesn’t appear in the Commands pane:

However if you query the list of commands on the shell via the API, you’ll be able to see it as well as invoke it:
Summary
In this section we reviewed different ways in which its possible to customize the appearance and behavior of commands and command parameters from the user’s perspective. If you have feedback or additional suggestions for features and improvements be sure to post them on our idea box. We’re always looking for new ideas!