Implementing Discovery for Inventory Shells Suggest edits
Automated discovery makes it easy to import physical inventory devices into CloudShell by using automation to read their internal structure and attributes.
Shell sub-resources
Physical resources Shells are defined with a certain internal structure which can be found in their CloudShell Standard. A basic physical resource can have Resource Port sub-resources, for example, whereas a Switch can have blades and port channels according to the Networking Shell Standard.
In the context of this example, we’ll create a new Switch type device based on the Networking Shell Standard. Run the following command to create a new Shell project:
shellfoundry new implementing-discovery --template=networking/switch
cd implementing_discovery
Resource templates and discovery
Auto-discovery can be automatically triggered when adding resources for Shells that support it. To do that, you can take advantage of the Shell resource templates feature. This feature provides a template for creating instances of resources for that Shell from the Inventory page of the CloudShell portal. When the administrator creates a resource this way, he is first prompted to fill out any mandatory attributes defined in the template, and then the discovery process is launched automatically.
A resource_template has been generated automatically as a part of the ShellFoundry template. The shellconfig.xml file located in the datamodel directory has the following content:
<?xml version="1.0" encoding="utf-8"?>
<ShellsConfiguration xmlns:xsd="http://www.w3.org/2001/XMLSchema" xmlns:xsi="http://www.w3.org/2001/XMLSchema-instance" xmlns="http://schemas.qualisystems.com/ResourceManagement/ShellsConfigurationSchema.xsd">
<ResourceTemplates>
    <ResourceTemplate Name="ImplementingDiscovery" Model="ImplementingDiscovery" Driver="ImplementingDiscoveryDriver">
        <Description></Description>
        <AutoLoad Enable="false">
            <Description>Description for autoload </Description>
        </AutoLoad>
        <Attributes>
            <Attribute Name="User" Value="" />
            <Attribute Name="Password" Value="" />
        </Attributes>
    </ResourceTemplate>
</ResourceTemplates>
</ShellsConfiguration>
As you can see, it currently defines two attributes as mandatory for the user to supply when creating a Shell resource. This means that when the discovery process will run it can count on that information already being available and can use the supplied credentials to login to the device. You can add additional attributes by adding additional <Attribute> elements under the <Attributes> element.
For this example, we’d like discovery to also be triggered automatically when adding new resources from the Inventory Dashboard. To change that, set <AutoLoad Enable=“true”> in the XML and save the changes.
Implementing the get_inventory function
The goal of the get_inventory function is to query the device and return a list of sub-resources and attribute values back to CloudShell.
After querying the device, the function should return a specific result to CloudShell to allow creating the right resources.
Add the following code to the driver:
# which includes details about the resource hierarchy and attributes
def get_inventory(self, context):
    """
    :type context: AutoLoadCommandContext
    """
    # Add sub resources details
    sub_resources = [ AutoLoadResource(model ='Generic Chassis',name= 'Chassis 1', relative_address='1'),
      AutoLoadResource(model='Generic Module',name= 'Module 1',relative_address= '1/1'),
      AutoLoadResource(model='Generic Port',name= 'Port 1', relative_address='1/1/1'),
      AutoLoadResource(model='Generic Port', name='Port 2', relative_address='1/1/2'),
      AutoLoadResource(model='Generic Power Port', name='Power Port', relative_address='1/PP1')]
As you can see, the get_inventory code creates a list of AutoLoadResource objects which are the sub-resources to be imported/synched with CloudShell. Each AutoLoadResource object needs to be initialized with three parameters:
- The name of the resources
- The model of the resource according to the standard. The Networking Shell Standard defines a list of possible models, among them the ones used in this example.
- The relative_address of the resource. This field is also used to derive the hierarchy of the sub-resources. As you can see in the above example, ‘Chassis 1’ has the address “1” whereas the resource ‘Generic Module’ has the address of ‘1/1’ which is all we need to do to indicate the module is nested under the chassis in the resource structure.
Notice that we’re only returning information about sub-resources. The root resource at this stage already exists, with the mandatory attributes defined by the template already assigned to it.
Adding attribute information
So far we’ve seen how to return information about sub-resources. We also may want to populate some of the resource attributes at this point with values we’ve loaded from the device. We can update both the root resource and the sub-resources attributes, again referencing them by their addresses which we’ve provided previously.
After populating the attributes information, we need to return the result object with both sub-resources and attributes:
AutoLoadAttribute('', 'Model', 'Catalyst 3850'),
               AutoLoadAttribute('', 'Vendor', 'Cisco'),
               AutoLoadAttribute('1', 'Serial Number', 'JAE053002JD'),
               AutoLoadAttribute('1', 'Model', 'WS-X4232-GB-RJ'),
               AutoLoadAttribute('1/1', 'Model', 'WS-X4233-GB-EJ'),
               AutoLoadAttribute('1/1', 'Serial Number', 'RVE056702UD'),
               AutoLoadAttribute('1/1/1', 'MAC Address', 'fe80::e10c:f055:f7f1:bb7t16'),
               AutoLoadAttribute('1/1/1', 'IPv4 Address', '192.168.10.7'),
               AutoLoadAttribute('1/1/2', 'MAC Address', 'te67::e40c:g755:f55y:gh7w36'),
               AutoLoadAttribute('1/1/2', 'IPv4 Address', '192.168.10.9'),
               AutoLoadAttribute('1/PP1', 'Model', 'WS-X4232-GB-RJ'),
               AutoLoadAttribute('1/PP1', 'Port Description', 'Power'),
               AutoLoadAttribute('1/PP1', 'Serial Number', 'RVE056702UD')]

result = AutoLoadDetails(sub_resources,attributes)

return result
Notice that we’re using an empty string (‘’) to refer to the root resource when setting its attribute values.
Adding validations
A common enhancement for discovery functions that greatly improves the process usability is to validate that the attributes the user provided are correct. For example, trying to log in with the address and credentials and reporting back any error, or validating the that text doesn’t contain illegal characters.
Any exceptions you raise in the get_inventory flow will pop up the error message to the user so he/she can correct their input and try again.
Create a resource with the template
To test our code, first install the Shell using ShellFoundry. Next, go to the inventory page and click on the “Create New” button. A dialog will appear where you’ll be asked to select the template you wish to use and choose a resource name. Select the “ImplementingDiscovery” template, enter a name for the resource and click create.
The following dialog will pop up:
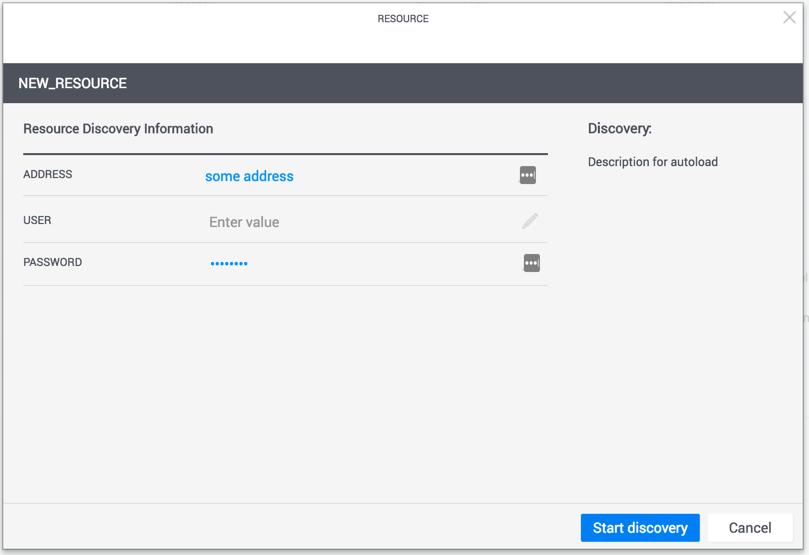
Enter some values for the Username/Password attributes and click start discovery. This will run the get_inventory function we’ve created and if everything works correctly create the entire device structure and a message should pop up indicating the discovery processes completed successfully.
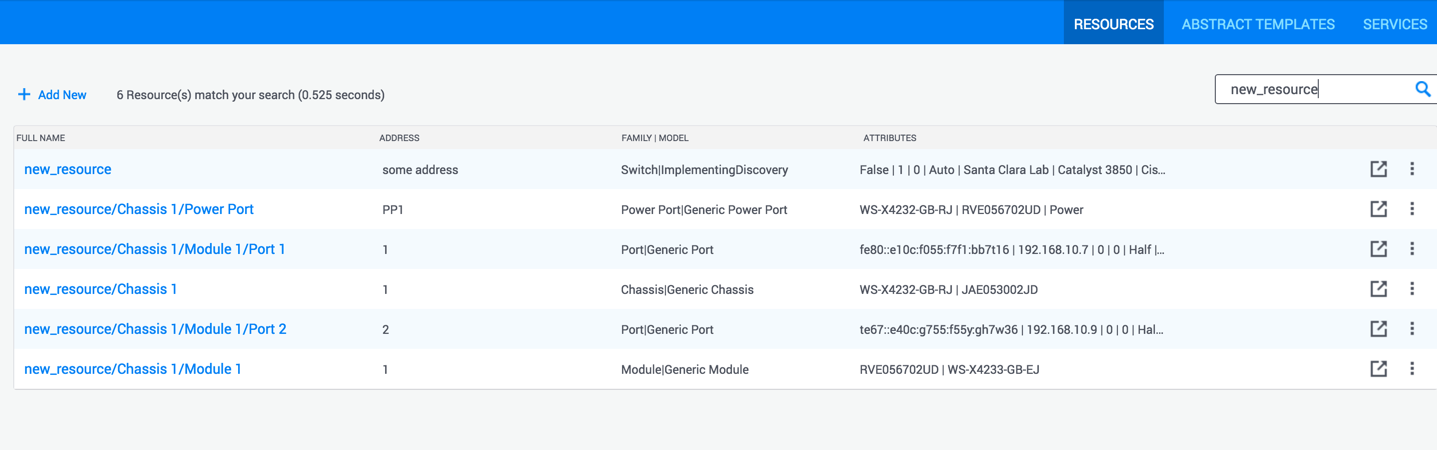
To validate, enter the name of the new resource in the inventory search box. You should see a list of sub-resources with the discovered attributes: