Getting Started Suggest edits
This section will take you through the basic steps of a creating a new Shell. The goal is to demonstrate the end-to-end cycle, from generating a new Shell project to instancing Shell resources and running commands in CloudShell.
Prerequisites
- Get CloudShell: Download the latest CloudShell SDK and run it on your machine.
- Python: You must have Python 2.7.x (latest recommended) installed on your machine.
- IDE/Text Editor: Any IDE or editor you’d rather use as an IDE. We recommend using PyCharm (which offers a free community edition) because of the tooling we’ve already created for that IDE, including a CloudShell developer plugin.
- ShellFoundry Install ShellFoundry using pip. Run the following in your local shell:
python -m pip install shellfoundryCreating the Shell Project
To create the shell project, we’ll take advantage of ShellFoundry, a CLI tool for generating and distributing shells. If you installed the prerequisites listed above this tool should already be installed and ready on your system.
To create a new project, simply run the following command in your local shell, which will create a new sub directory containing the basic shell project structure and files:
shellfoundry new linux-server-shellNavigate to the new directory, you will see the following files have been created for you:
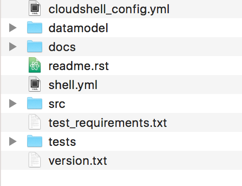
The generated folder contains all of the basic scaffolding needed for the new shell. We will review the shell project structure in a more in-depth manner in later stages of this guide.
Finally, let’s make sure all of the basic package requirements for the shell are satisfied. Run the following command from the root of the project directory:
python -m pip install -r .\src\requirements.txtTesting the basic workflow
Make a minor change to the driver
The source control for your shell is managed under the src folder. When generating the project template, ShellFoundry already created a driver template as well under this folder. Open the file driver.py in your preferred IDE/editor. You’ll see it already contains a driver for our shell with an example command already in place. We’ll soon implement our first command in this file. For now, let’s just make sure everything is in working order by adding a simple ‘hello world’.
Remove the ‘example_function’ function and replace it with the following code:
def say_hello(self, context, name):
    """
    :param ResourceCommandContext context: the context the command runs on
    :param str name: A user parameter
    """
    return "hello {name} from {resource_name}".format(name=name, resource_name=context.resource.name)
We’ll also want to add basic metadata including aliases and descriptions. The way to do that is by editing the drivermetadata.xml file located in the same folder.
Open the drivermetadata.xml file in your preferred IDE and replace the highlighted section so that it matches the test below:
<Driver Description="Describe the purpose of your CloudShell shell" MainClass="driver.LinuxServerShellDriver" Name="LinuxServerShellDriver" Version="1.0.0">
    <Layout>
        <Category Name="Samples">
            <Command Description="Simple hello world function" DisplayName="Say Hello" Name="say_hello" >
                <Parameters>
                    <Parameter Name="name" Type="String" Mandatory = "True" DefaultValue="" DisplayName="Your name"
                               Description="Enter your full name here"/>
                </Parameters>
            </Command>
        </Category>
    </Layout>
</Driver>
There is no need to get into too many details at this stage. We’ll dive more deeply into the drivermetadata.xml file in a later section of this guide. For now its sufficient to understand that we use this file to provide more CloudShell specific information regarding how to interpret and display the driver commands and their parameters.
Save the file. We’re now ready to install the new Shell.
Install the shell to your local CloudShell
ShellFoundry also provides and easy and convenient way to package and install your package to your CloudShell server. To make use of this feature, you’ll need to first edit the cloudshell_config.yaml file, which is located root folder of the Shell Project. Update the file with your CloudShell admin user/password and the server address. Notice that this file should not be added to your source control obvious security reasons. If you’re using git you’re already covered as this configuration file is included in the automatically generated .gitingore file.
After you’ve edited and saved the file, run the following command from the shell root directory:
shellfoundry installThis will package and install your shell into your local CloudShell server.
Create an instance of your shell resource in the local CloudShell inventory
The shell is installed in your development CloudShell. We can now create resources of that Shell in our inventory.
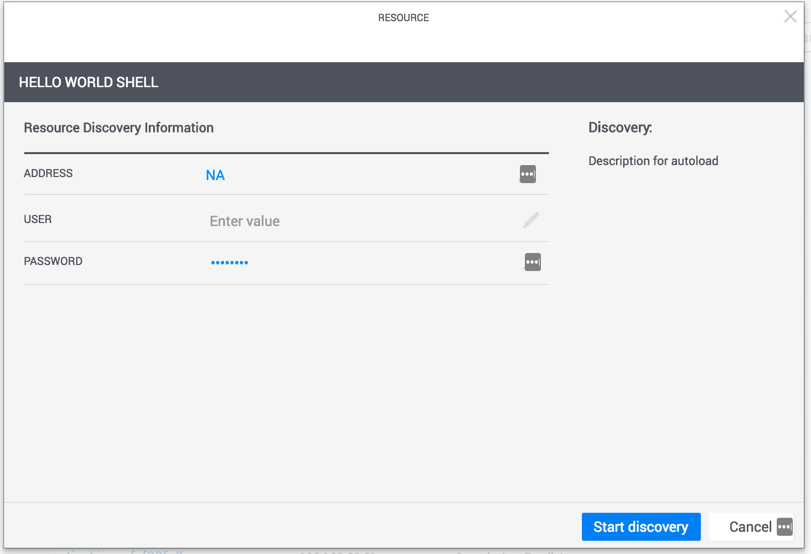
- Open and login to your local CloudShell portal.
- In the top menu, click the Inventory dashboard.
- Click Add New and provide a name and an address for your shell resource. For now, since we don’t have an address of an actual server, just leave the address field blank.
- Click on Start Discovery to complete the operation.
Hello world finally
Now that we’ve instantiated our shell resource, we can finally add it to an environment blueprint and reserve it as a sandbox.
- In CloudShell, from the top menu, click Lab Management> Environments
- To create a new environment blueprint, click + Create Environment and then click the Create New Environment button.
- Click Add New and drag in the shell resource you’ve created earlier.
- Reserve the blueprint and create a new sandbox.
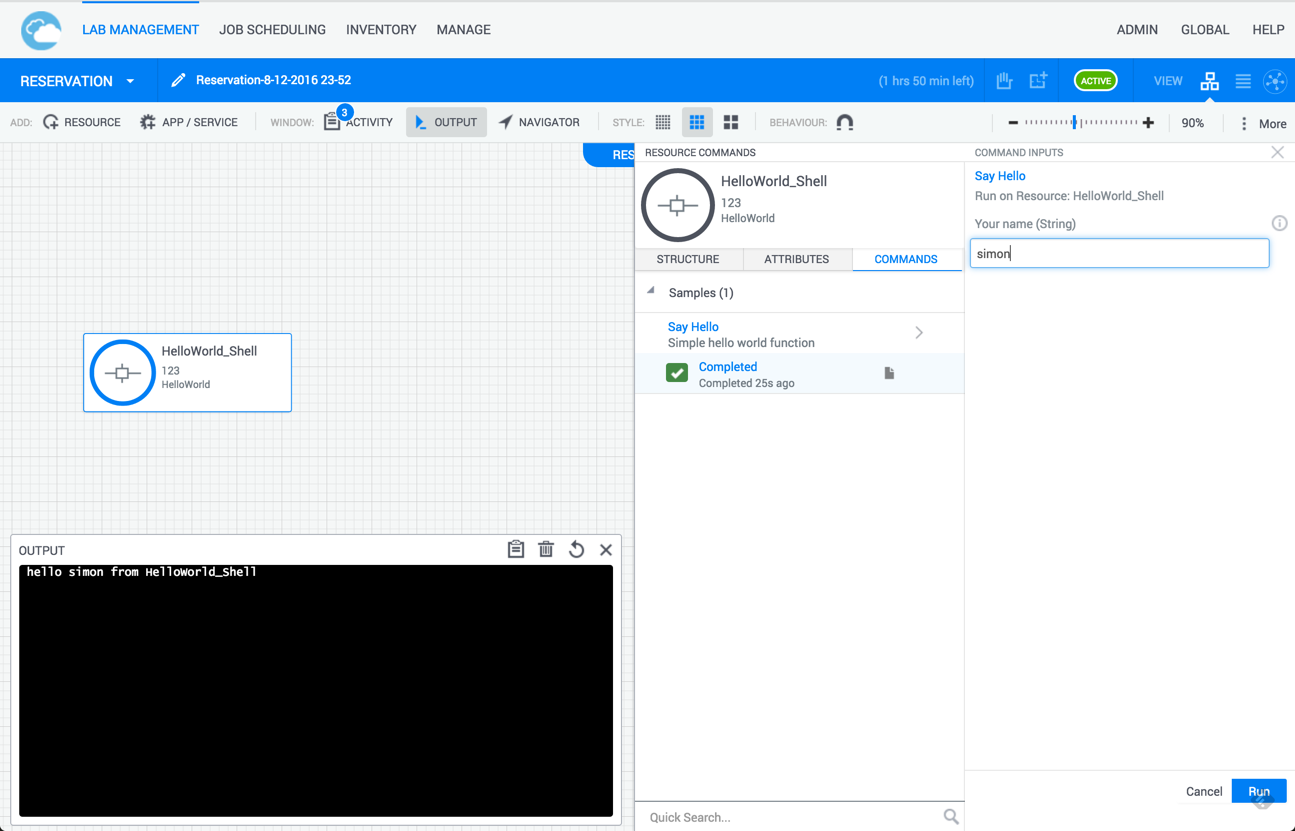
- In the sandbox, hover over the shell resource and from the radial menu select Commands. The commands pane opens.
- To run the “Say Hello” command, in the commands pane, click the play button next to the “Say Hello” command.
The common output will appear in the environment output pane.
Development process summary
In this tutorial we’ve seen the basic flow involved in developing a Shell. It can be illustrated in the below diagram:
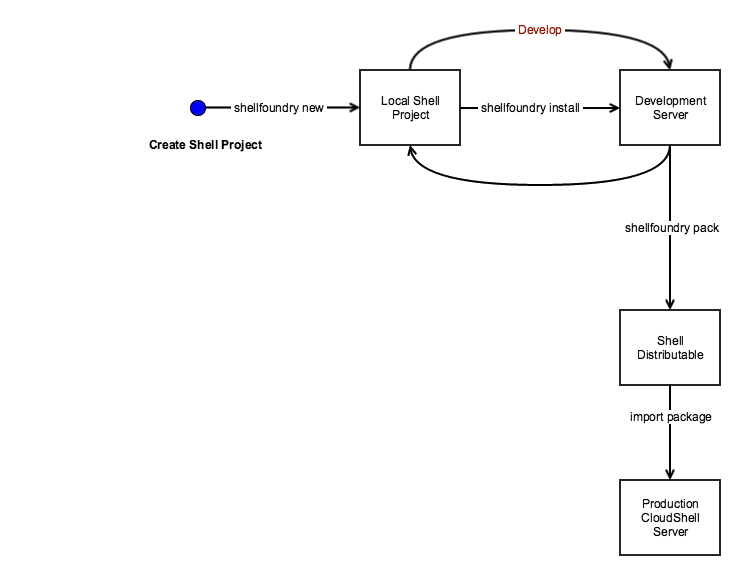
The basic flow is:
- Create a new Shell project by running shellfoundry new
- Configure your CloudShell credentials in the cloudshell_config.yml file located in the Shell project root
- Import the Shell to the development server using shellfoundry install
-
Create an instance of the Shell for testing
a. For an inventory resource Shell: Create a Shell inventory resource in CloudShell using its Resource Template.
b. For a deployed app Shell: Define the App template in CloudShell including the deployment type and parameters, set the App model to the Shell model.
- Create a sandbox for testing in the development server. Either add the Shell resource to the sandbox or deploy the App in the sandbox.
- Make incremental changes to the Shell and update the development server each time with your changes by running shellfoundry install
- Rinse and repeat!
For more information on how to deploy the Shell to production, refer to the Deploying to Production section.
What’s next
We’ve successfully gone through the steps of adding a working, if naive, Shell. In the following sections we’ll review all of these steps in depth and review the concepts, available options and customizations and how they interface with CloudShell.